Advertising disclosure: This page includes affiliate product links that may earn us a commission, as well as products from our own store.
For an experienced lifter, the kettlebell snatch can look almost effortless. For someone who misses one timing detail, it can become a painful forearm collision followed by a shaky overhead save. The solution is not to pull harder with your shoulder. Think about an explosive hinge, a compact bell path, a well-timed hand insertion and an overhead position you can actually control.
This guide builds those skills in order, explains why the downswing matters as much as the ascent, and offers a realistic four-week progression without making high-rep exhaustion the goal.
Start with a reliable hip hinge and an overhead position you own
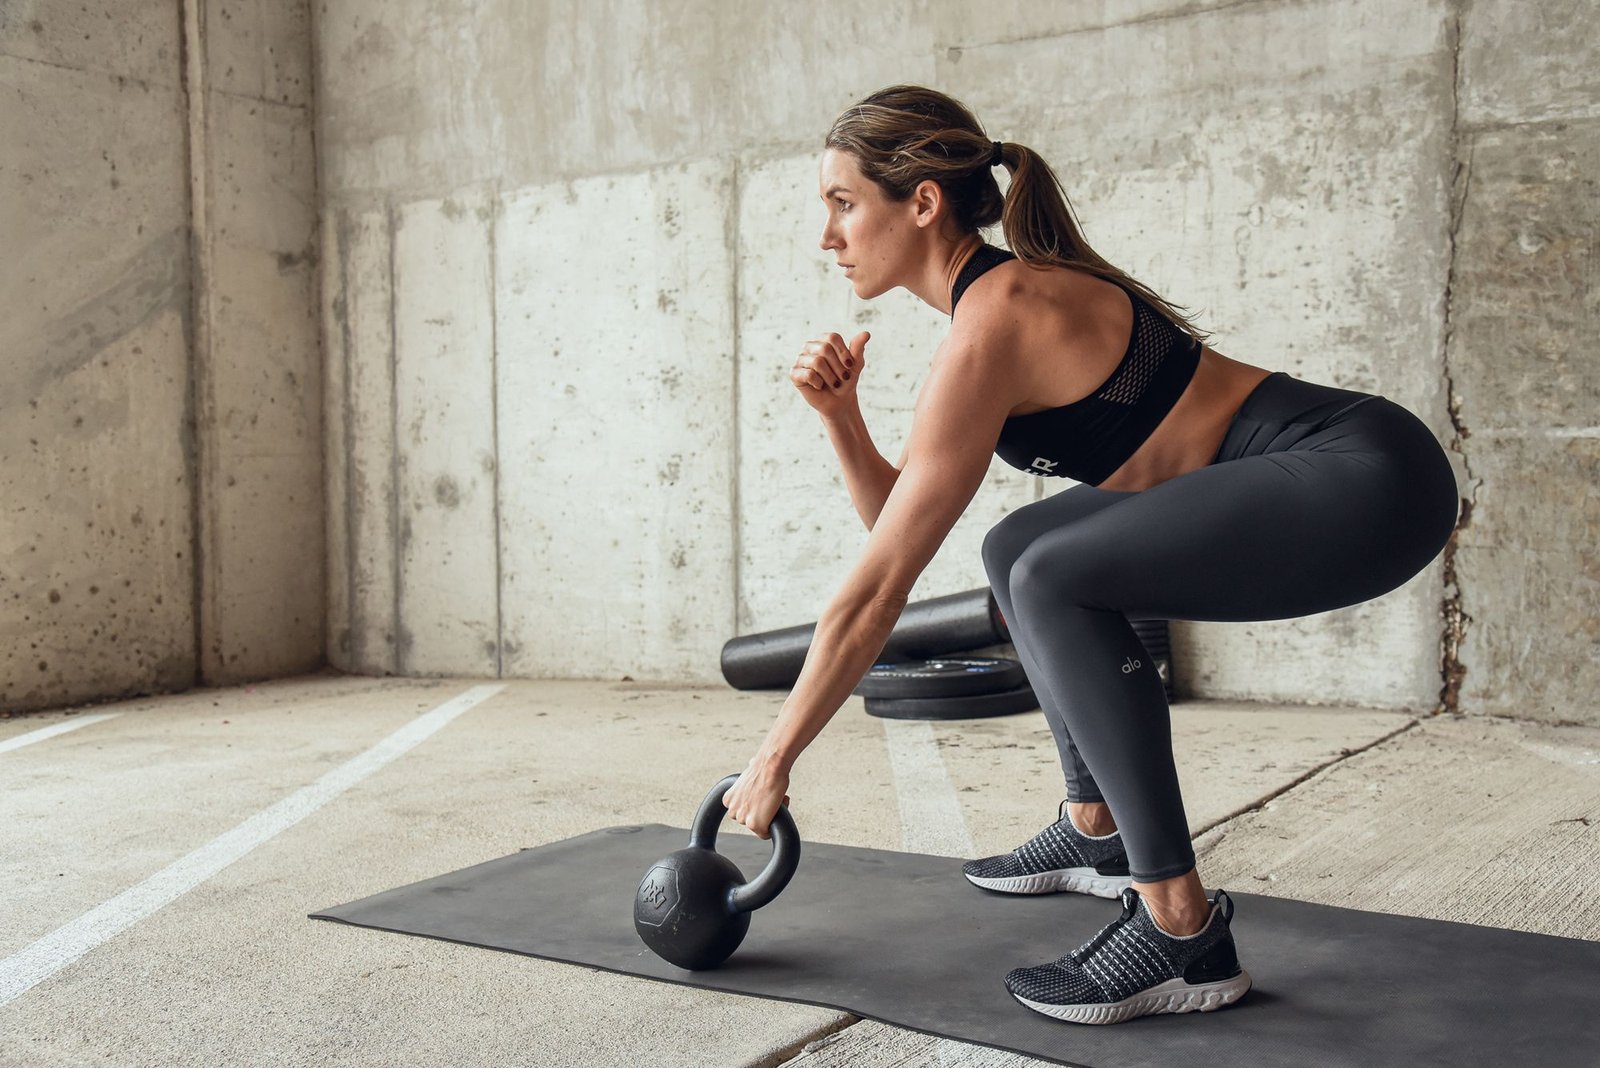
A snatch is a ballistic lift: the kettlebell travels from a backswing to overhead in one continuous action. It is not simply a high front raise or a shoulder press. Before adding speed, be confident in a one-arm swing and a high pull. If every swing turns into a squat, a rounded-back tug or a chase across the floor, the snatch will amplify the same problem. Train the simpler pattern first.
Begin with your feet set comfortably around hip-to-shoulder width. Place the bell a short reach in front of you, bend your knees slightly, and send the hips back. Your trunk stays firm while the shoulders reach forward without slumping. Take the handle securely, tilt the bell and hike it high between the legs. The first rep should look deliberate, not like you are pulling a weight off a shelf.
There are two different prerequisites: the ability to accelerate from the hips and the ability to support the weight overhead without pain or a dramatic back arch. You can be strong at rows and deadlifts yet still lack the latter. Check a light single-arm overhead hold before attempting repeated snatches. If your shoulder cannot settle into a comfortable locked-out position, use swings, cleans or an appropriate alternative.
A useful early standard is five crisp single-arm swings on each side without the bell pulling your body out of balance. The free arm can move naturally for counterbalance; it should not twist your trunk to rescue a poor hinge. Start with a light weight that leaves plenty of technical room rather than one you can barely hoist.
Make the hips accelerate the bell while the arm guides its path
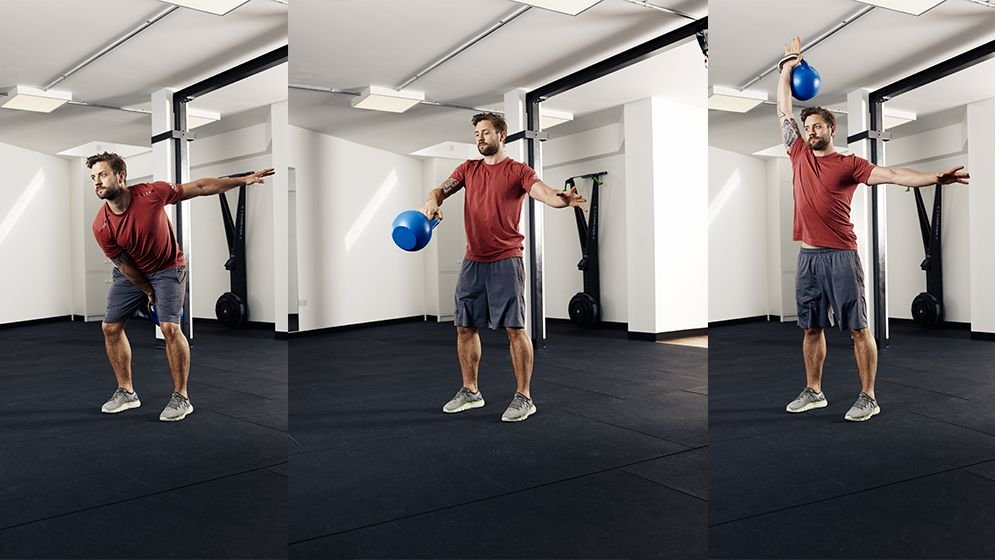
Explosive hip extension supplies the first large impulse. From the loaded backswing, drive your feet into the floor and stand tall quickly. The working arm guides and redirects the bell rather than being responsible for hauling it up. If you feel your biceps and upper traps doing everything, you probably missed the timing of the hip drive or let the bell get too far away.
The trajectory should be a compact arc. It is not literally a straight line, but neither is it a big loop out in front of your torso. As the bell gains height, guide your elbow back enough to keep the implement relatively close. A bell that sails far forward must be pulled back at the top, making the hand transition harsher and the overhead finish more difficult to stabilize.
Practice a high pull before the full snatch. Three light reps per side should show planted feet, brisk extension, a quiet neck and a bell that rises toward chest height without a huge backward lean. You can also film the movement from the side: the hips should finish their work before the bell reaches its peak. Avoid trying to solve a weak hip drive by jumping or muscling the load upward.
Different schools of kettlebell training use different rhythms. Hardstyle work tends to emphasize explosive repetitions and forceful bracing, while kettlebell sport can use a more economical technique over longer sets. Neither style requires the bell to crash into your forearm. Choose a consistent method rather than mixing technical cues in a single tired set.
When a set slows down, do not assume heavier is automatically better. For ballistic practice, the useful load is the one you can accelerate repeatably and settle overhead without losing the shape of the lift.

Equipment Worth Exploring
Explore equipment, accessories and gear from our carefully selected range.

Cast Iron Kettlebells
Textured cast-iron kettlebells for swings, squats, carries, and full-body training.




Rubber Hex Dumbbells
Rubber-coated hex dumbbell pairs with a stable shape for home and commercial strength training.

Insert the hand through the handle instead of accepting a wrist slap
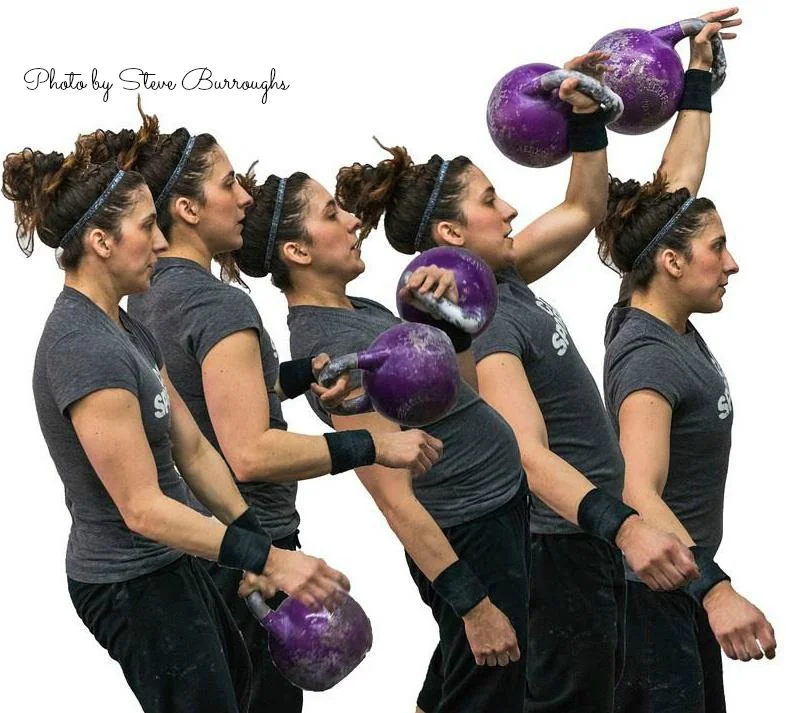
Many new lifters can get the kettlebell high enough, but the body of the bell flips over and smashes the forearm. That is usually a timing-and-path issue. As the bell rises, allow the handle to rotate enough for your hand to enter its window. Guide your knuckles upward and through rather than leaving the fist stationary until the bell tumbles onto it.
The contact should be quiet. At the top, the bell rests against the back of the forearm with the wrist in a solid alignment. An aggressively bent wrist or bruised forearm is not proof that you trained hard; it is feedback to lighten the bell and work on the insertion. Too much grip tension can prevent the handle moving, but too little lets it slide without control.
Try the hand motion slowly without a weight. Then do short sets with a lighter kettlebell, keeping the bell near the body as you extend. Some trainees learn best by inserting the hand after a controlled high pull; others need a brief pause from an assisted overhead starting position. Neither requires you to throw the bell higher and hope for a softer collision.
Look at the preceding moments if contact is harsh. Was the arc too wide? Did you pull too early with the arm? Did the elbow straighten before the hand was ready? Correct the earliest faulty part. Thick wrist guards may reduce discomfort, but they cannot make a poor handle path safe or consistent.
The skin also needs attention. A palm that tears repeatedly may be gripping too hard through a rolling handle or absorbing the drop in the fingers. Stop before that pattern becomes a blister-management exercise. Clean, dry handles and modest practice volume make learning more predictable.
Settle into a balanced lockout without leaning under the weight
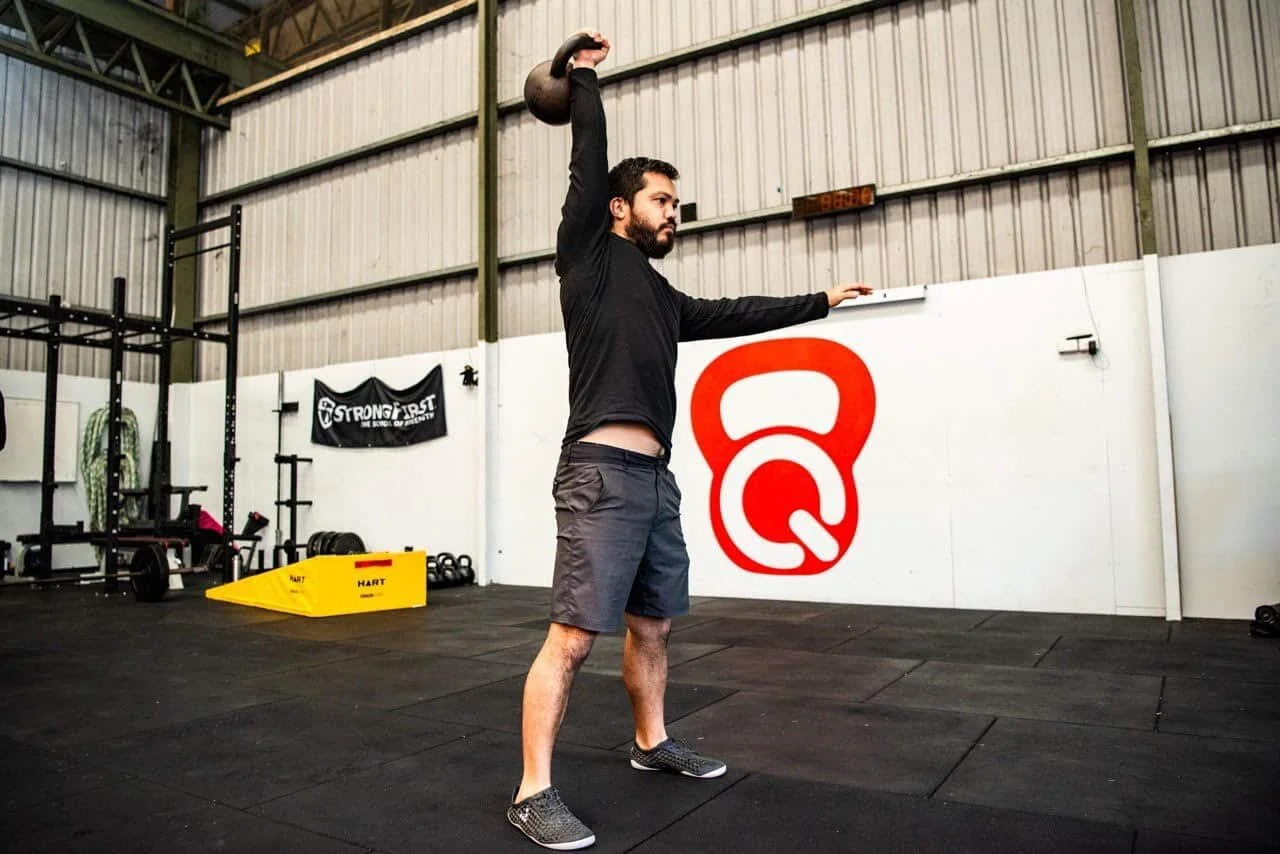
The bell reaching head height is not the finish. A completed snatch ends with a stable, straight-ish supporting arm, shoulders organized and ribs roughly stacked over the pelvis. Stand tall and resist turning the movement into a backward-bending rescue. Your trunk helps keep the asymmetric load over the base of support.
Imagine a standing plank with one arm supporting the bell. The wrist stays comfortable, the elbow is securely extended within your natural range, and your eyes stay forward. A small adjustment through the feet or ankles may be normal. Repeatedly leaning at the lumbar spine or pushing the bell far behind the head is a sign to reduce load or work on overhead mobility and control.
Pause for a quiet count of one on technical sets. If you cannot hold that top position without shaking, shrugging or moving your feet, do not rush into the next rep. A light strict overhead hold or one-arm press may be a better drill until you can support the weight calmly. Snatches are optional; there is no reason to force painful overhead movement to earn an athletic training effect.
The free arm should not swing wildly or spin your torso. It may help balance, but the legs remain planted and the hips finish square. Film from the front as well as from the side if you notice one shoulder rising significantly higher or a strong rotation during the catch.
The most useful measure of progress is whether the overhead position looks equally controlled from rep one through the final rep. A heavier kettlebell is meaningful only if the standard survives the load increase.
Absorb the descent with the hips rather than catching it with the arm
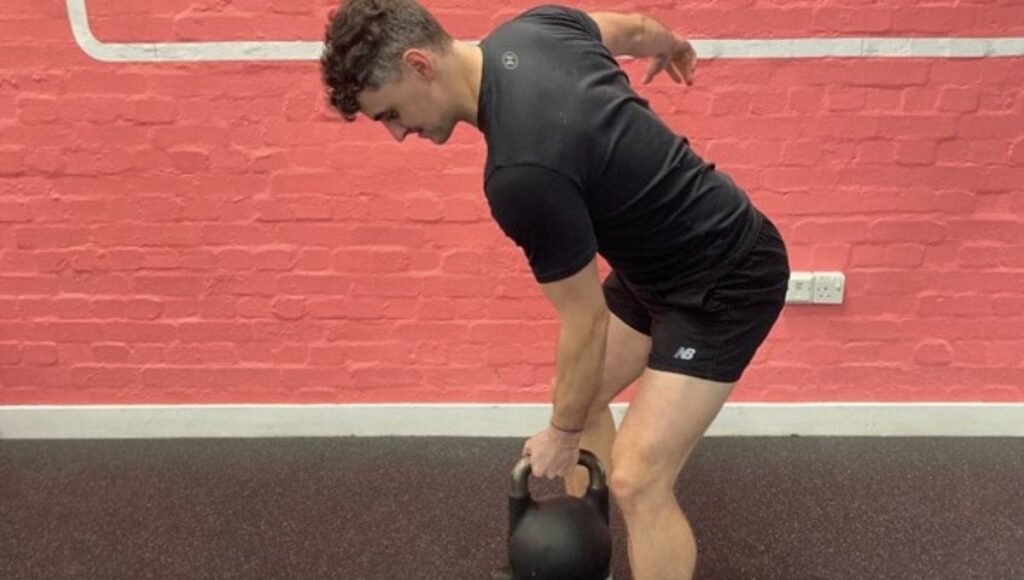
The return path is part of the exercise, not an afterthought. Start by letting the bell move out of the overhead position while guiding it toward your torso. Soften the elbow enough to bring it down in a controlled path. Simply releasing the bell into a free fall and trying to arrest it with your fingers turns a technical lift into a stressful grip test.
As the bell passes your body, send the hips back and guide the weight high between the thighs. The hinge absorbs the descending momentum and prepares the next drive. Think of loading a spring in the hips, not dropping the chest toward the floor. Your back position should remain organized while the feet keep firm contact.
Beginners can park the bell between singles. That removes the need to solve the downswing and next upswing simultaneously. When singles are consistent, try connecting two repetitions, then three. If your forearm gets jerked downward or your palm is rubbed raw, you may be stopping the bell with the arm instead of redirecting it into the hinge.
Keep your handle clean, check the surface around you and stop when the weight becomes difficult to control. A dropped kettlebell is a genuine hazard. Use enough training space that another person cannot walk into the moving bell. Chalk or protective accessories can affect comfort, but neither fixes an uncontrolled descent.
If your current goal is simply conditioning, a kettlebell swing or carry can give you plenty of demanding work without an overhead catch. Use the complex snatch only when its technical demands serve the goal. Good exercise selection is a performance tool, not an admission of weakness.

Functional Fitness Shirts & Workout Gear
Functional-fitness shirts, tanks and workout gear for athletes who train strength, conditioning and everything in between.

Muscle Mommy Pink Kettlebell Gym Design for Women & Str T-Shirt
For laid-back days and gym-girl humor: “Muscle Mommy”.

Gym Is My Happy Place Happy Kettlebell Emoji Decal Sticker
Give your everyday gear a playful “Gym Is My Happy Place” twist.

Kettlebell Rap God | Slim Shady Workout Pullover T-Shirt
Keep things casual with a little “Kettlebell Rap God” attitude.

Hybrid Athlete Strength & Endurance Tank
Add some lifting attitude to training with “Hybrid Athlete”.

Kettlebell Heartbeat Muscle Shirt Athletic Vest Workout Tank Top
Add some lifting attitude to training with “Kettlebell Heartbeat”.

For Whom the Bell Curls Tee
Show some metalhead attitude with a playful “For Whom The Bell Curls Kettlebell” tee.

Atlas Kettlebell Earth Lifting – Meme Top T-Shirt
Rep “Atlas Kettlebell Earth Lifting Graphic” humor in and out of the gym.


Gym Equation Kettlebell Makes Me Happy Design Workout a Hoodie
Make your off-duty look more fun with “Gym Equation”.

Happy Kettlebell Emoji Smiley Kettlebell for Fitness Lo Hoodie
Show off your gym-girl humor in a laid-back “Happy Kettlebell Emoji” hoodie.
Build four weeks of clean repetitions before chasing heavy snatch tests
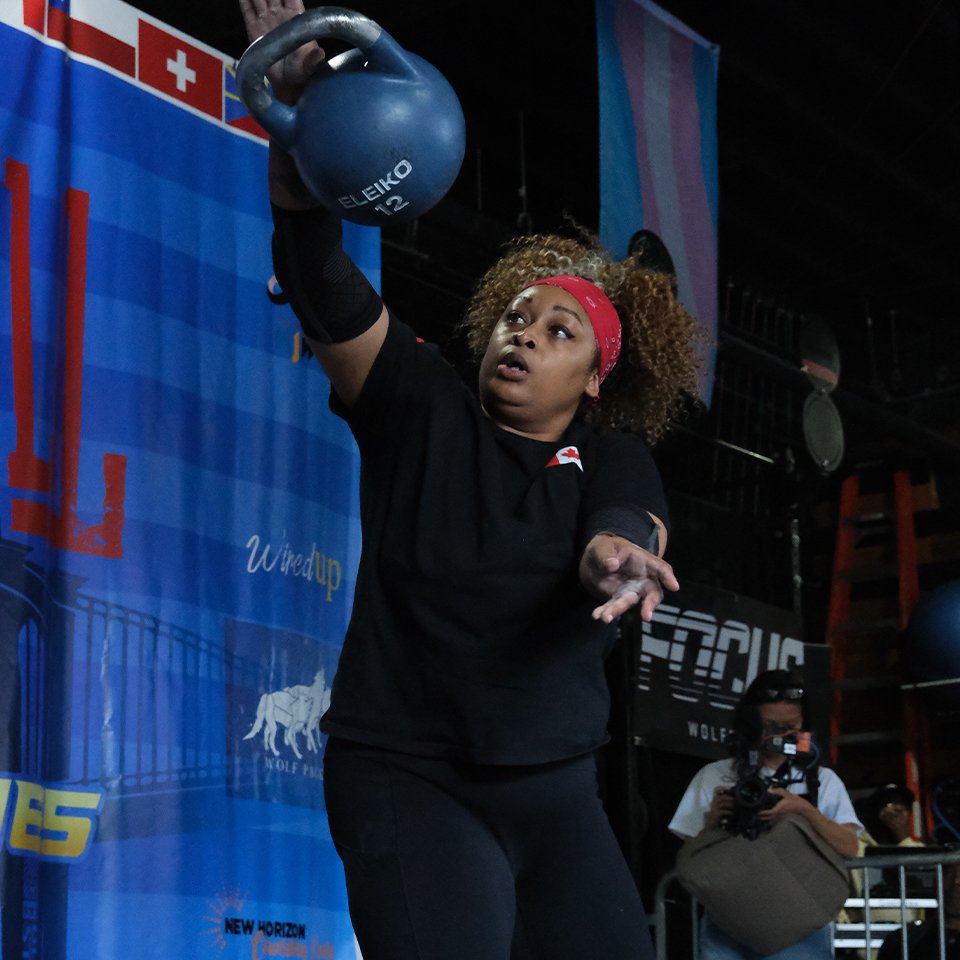
Practice quality and conditioning separately. Start with a weight that you can accelerate sharply, receive smoothly, hold overhead and guide down under control. A high heart rate does not guarantee high-quality repetitions. Two nonconsecutive technical sessions per week give many lifters enough opportunity to rehearse without turning every session into a grip-endurance contest.
Week 1: learn the pieces. Warm up with easy hinges and swings. Perform three sets of three controlled one-arm high pulls per side. If overhead mobility and hand insertion are already solid, add four sets of two snatch singles per side, parking the bell each time. Take enough rest for every rep to look similar.
Week 2: link short sets. Keep two practice days. Try five sets of two to three snatches on each side with complete control on the return. Pause briefly overhead. If the bell starts slapping or the back arches, revert to singles at a lighter load and correct the pathway.
Week 3: add a little volume. Build to four to six sets of three or four per side only if the technique remains quiet. Start with the less-coordinated arm and match the total on the stronger side. Add only a small number of repetitions; do not also make a large jump in weight or cut rest substantially.
Week 4: evaluate and choose one progression. Repeat a familiar load and review side-view video, hand insertion, lockout and descent. If the standard holds, choose one change for your next block: a small kettlebell increase, one additional clean set or slightly shorter rest. A frantic high-repetition test is not necessary to prove mastery.
Equipment matters less than a comfortable, predictable handle. Fixed-weight bells are straightforward; an adjustable kettlebell can help with incremental loading if its design and locking mechanism are explicitly suited for ballistic snatches. A dumbbell snatch is a valid alternative but uses different hand mechanics. Choose equipment for the movement actually being performed, and treat success as repeatable reps rather than a collection of bruises or rushed personal records.