Advertising disclosure: This page includes affiliate product links that may earn us a commission, as well as products from our own store.
The dead bug is deceptively hard when performed well. Add a dumbbell or kettlebell moving behind your head and a simple floor drill becomes a test of whether your rib cage and pelvis can stay organized while your shoulders move. You do not need a heavy weight to feel the difference: a longer arm lever can expose a loss of control before the abs feel close to failure.
The dead bug pullover is best understood as controlled anti-extension training, not a shortcut to wider lats or a competition to lower the bell to the floor. Here is how to set it up, separate the two main versions, correct the common breakdowns and progress it without turning a precise core exercise into a sloppy pullover.
What makes the dead bug pullover different from a regular dead bug?
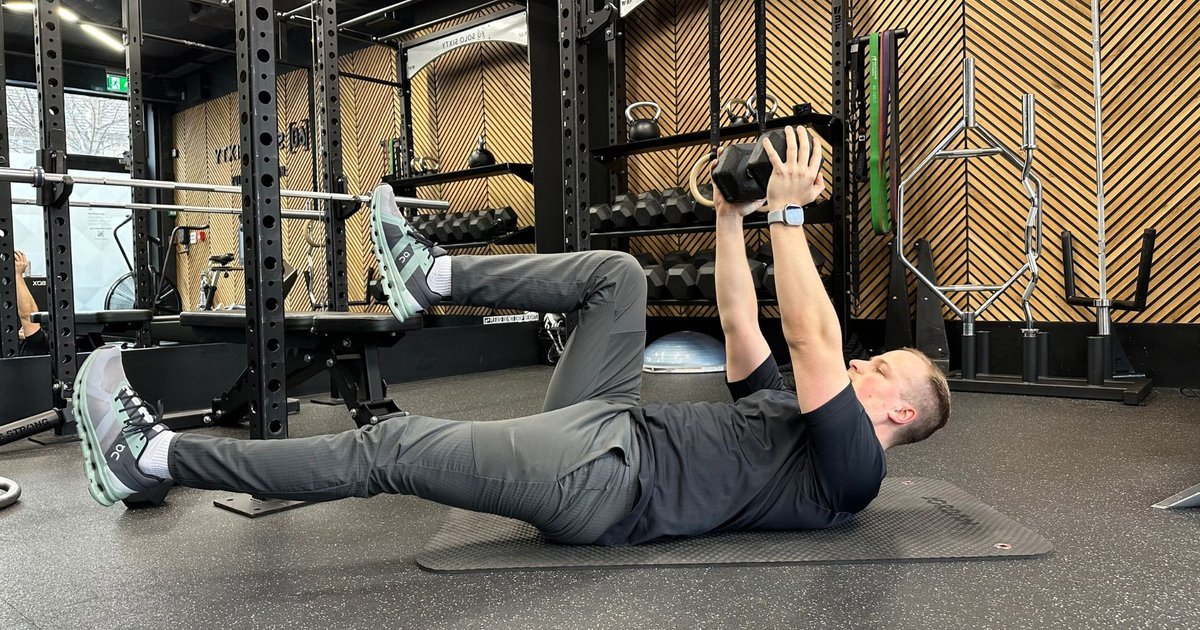
In a standard dead bug, the limbs move while the trunk resists being pulled into a bigger low-back arch. The pullover variation introduces a second lever: an external load moving from above your chest toward the space behind your head. That overhead arc can encourage the lower ribs to lift and the lumbar spine to extend. Your abdominal wall must resist that tendency while your shoulders and lats guide the implement.
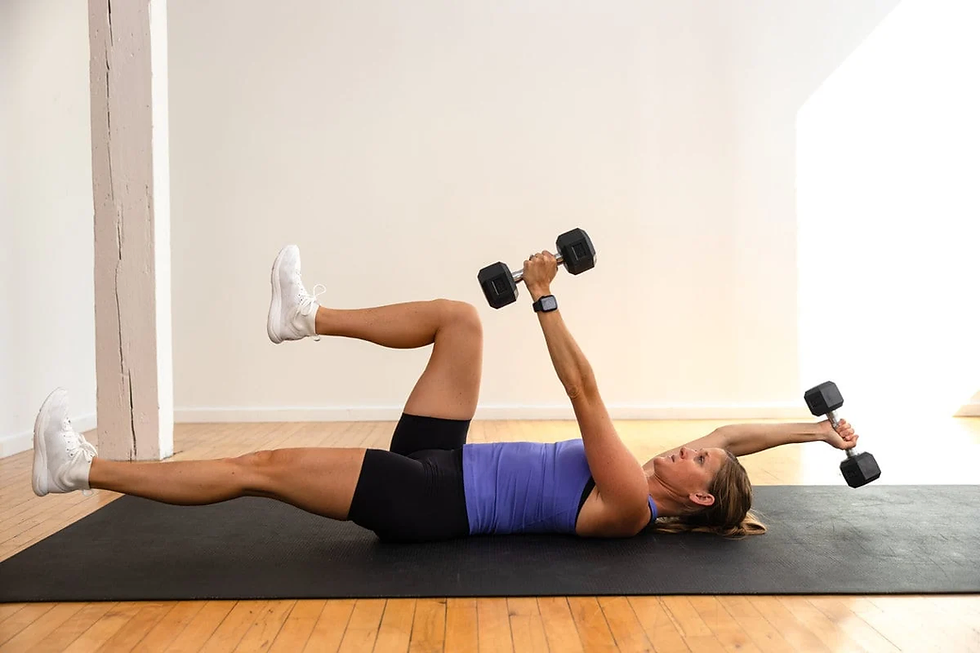
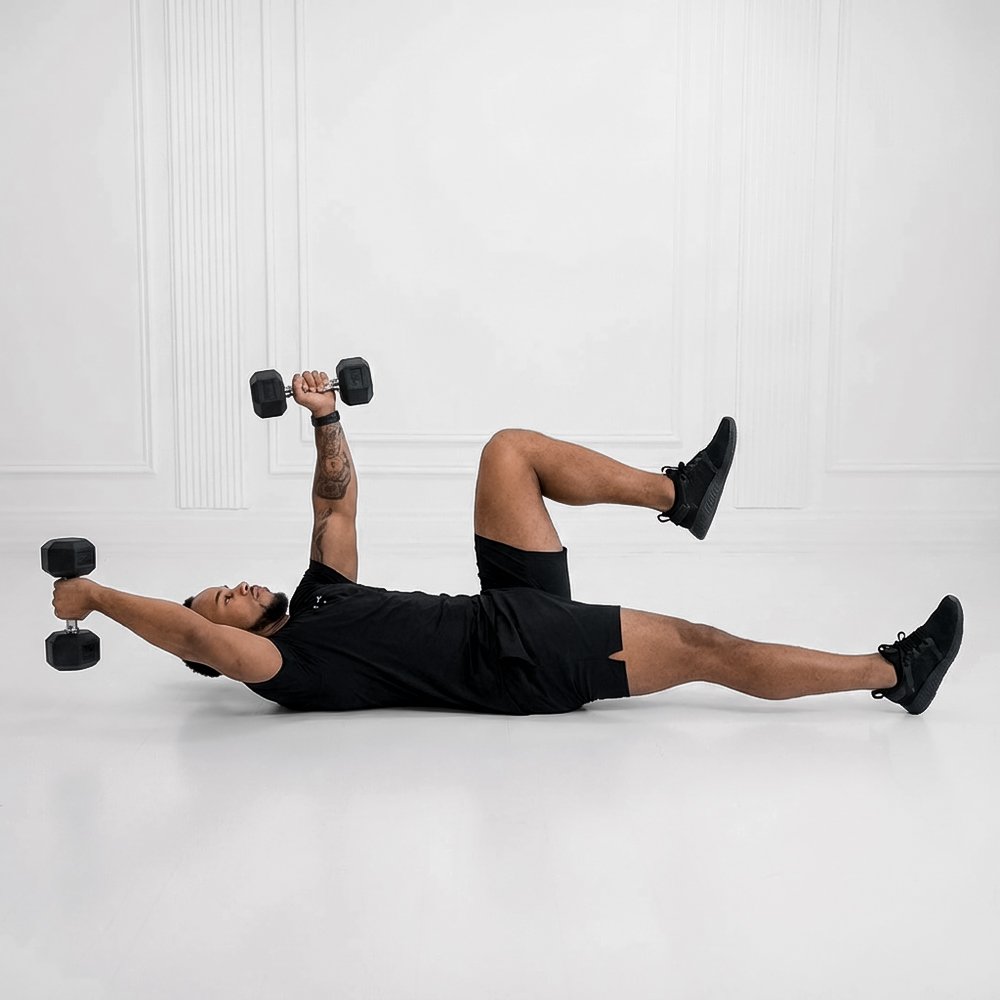
Two versions deserve separate names. In the tabletop pullover, both hips and knees remain bent around 90 degrees and only the loaded arms move. This is a clean introduction because the legs remain still. In the alternating-leg pullover, one leg extends as the weight travels overhead, then returns as the weight comes above the chest. That moving leg increases the challenge to pelvic control. Neither version is inherently better: the appropriate one is the version you can execute consistently.
The goal is not to press the entire lumbar spine as forcefully as possible into the mat. Start with a comfortable rib-and-pelvis relationship, then resist an increase in your normal low-back arch as the lever lengthens. A gentle flattening cue can help some people, but forceful spinal rounding is not required. If keeping a particular position causes discomfort, shorten the range or choose another drill.
Think of your abs as the brakes, your lats and shoulders as the moving parts, and the kettlebell as an adjustable lever. The bracing demand is most obvious when the weight moves far from the chest, not when it sits vertically above it.

Equipment Worth Exploring
Explore equipment, accessories and gear from our carefully selected range.


Cast Iron Kettlebells
Textured cast-iron kettlebells for swings, squats, carries, and full-body training.


Rubber Hex Dumbbells
Rubber-coated hex dumbbell pairs with a stable shape for home and commercial strength training.


Slam Ball
Low-bounce weighted slam ball for explosive throws and high-intensity conditioning.

Competition Wall Ball
Competition-style weighted wall ball for HYROX, wall-ball shots, and functional conditioning.
Set up the weight, tabletop position and shoulder arc
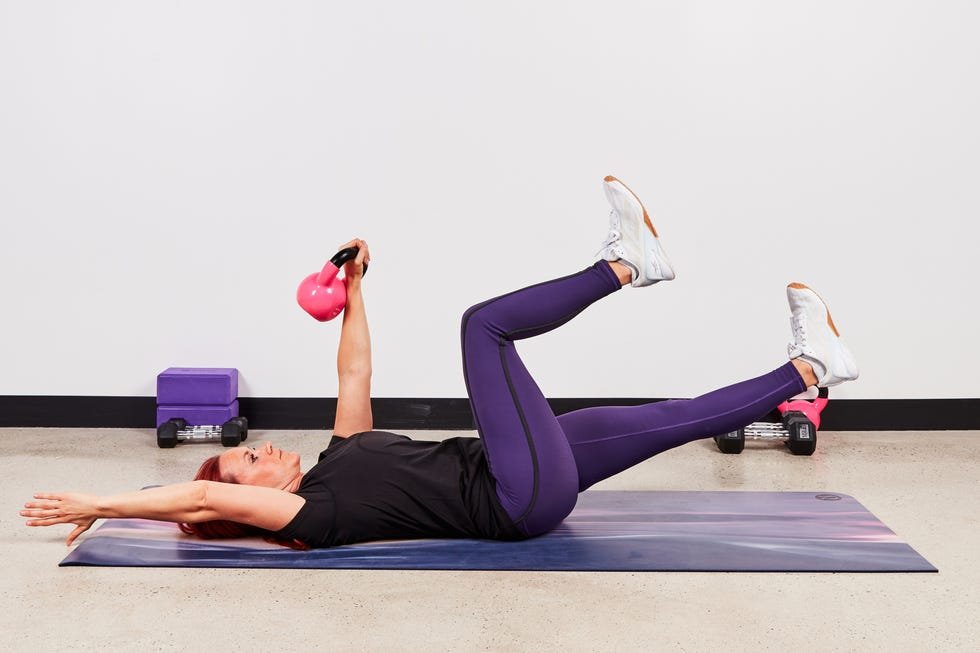
Use a flat, non-slip mat with clear space behind your head. Choose a light implement that you can hold securely with both hands. For a dumbbell, grip one head firmly with both palms supporting it, or use a reliable two-hand handle grip; do not balance an unsecured plate over your face. For a kettlebell, establish a controlled two-hand grip on the handle and check that the bell cannot swing into your head. An unstable grip is a reason to change the implement, not to tighten your abs harder.
Lie on your back, bring the load above your sternum, and reach your arms toward the ceiling with a small, consistent elbow bend. Raise one leg and then the other into tabletop. Begin with the ribs relaxed rather than thrust toward the ceiling. Exhale gently to find a stable trunk, then take a smaller breath without letting that position disappear. Your head and neck should feel comfortable and your shoulders should be free to rotate.
Now lower the weight only a short distance behind your forehead. Pause briefly, then return it above the chest. If the torso stays quiet, explore a slightly longer arc on the next repetition. The moment your ribs spring up, your back arches markedly, the implement wobbles, or your shoulder pinches is the end of your useful range for that set. The floor is not a mandatory endpoint.
A light weight can be challenging precisely because the goal is to keep everything except the intended joints still. It is usually wiser to add range and control before adding kilograms. Complete the first few reps with both legs frozen in tabletop to learn what your back and ribs are doing.
How to coordinate the leg extension, breath and tempo
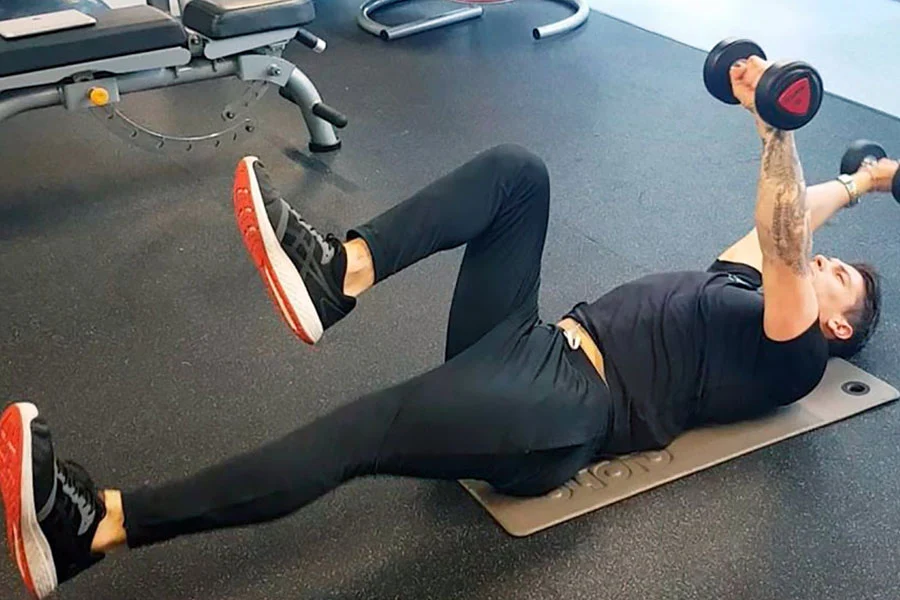
Once the arms-only version is repeatable, coordinate a single leg with the arm arc. Begin with the dumbbell above your chest and both knees bent. As the weight travels behind your head, slowly reach your left heel away from your hip. The right leg stays in tabletop. Return the weight and the left leg together, reestablish the start position and repeat with the right leg. Alternate sides deliberately instead of kicking the legs back and forth.
The heel does not have to skim the floor. Extending the leg farther increases its leverage on the pelvis, so stop higher when a lower position makes you lose control. Keep the reach smooth, with the knee comfortably extending rather than snapping straight. A useful beginner rhythm is roughly two to three seconds moving away and two seconds returning. These are coaching choices, not a scientifically established magical tempo.
Breath should support the brace rather than freeze your chest indefinitely. Exhale gently as you approach the hard portion, take a controlled breath when you can and avoid holding your breath through a long set. If you cannot speak a few words after the rep, you may be bracing more aggressively than this low-load drill requires.
Count one repetition when the weight and the same leg both return to the start. Six repetitions per side therefore mean twelve controlled leg reaches, not six total. Stop when the final rep looks different from the first, even if your spreadsheet has room for more. In anti-extension drills, technical consistency is the most useful measure of progress.

Functional Fitness Shirts & Workout Gear
Functional-fitness shirts, tanks and workout gear for athletes who train strength, conditioning and everything in between.

Vitruvian Kettlebell Tee
Heavy lifts, good laughs, and a little “Vitruvian Man With Kettlebells” energy.


Kettlebell Skull Tee
Heavy lifts, good laughs, and a little “Kettlebell Skull Gym Meme” energy.

Atlas Kettlebell Earth Meme Greek God Top T-Shirt
Make gym days more fun with “Atlas Kettlebell Earth Lifter” style.

Grunge Kettlebell Shirt Rock Music & Gymbros Top T-Shirt
Rep “Grunge Kettlebell” humor in and out of the gym.

Hell's Bells Kettlebell Tee
Show some rock-and-lifting attitude with a playful “Hell's Bells Kettlebell” tee.

Shirt – Day Of The Dead Kettlebell – Dia De Los T-Shirt
Bring “Day of the Dead Kettlebell” humor to your next gym day.

Super Kettlebell Hero Superman & Gymbros Meme Top T-Shirt
Show some superhero attitude with a playful “Super Kettlebell Gym Hero” tee.

Vive La Resistance Bands – Resistance Bands Warmup Mobi T-Shirt
Rep “Vive La Resistance Bands” humor in and out of the gym.

Five mistakes that turn a core drill into a risky pullover
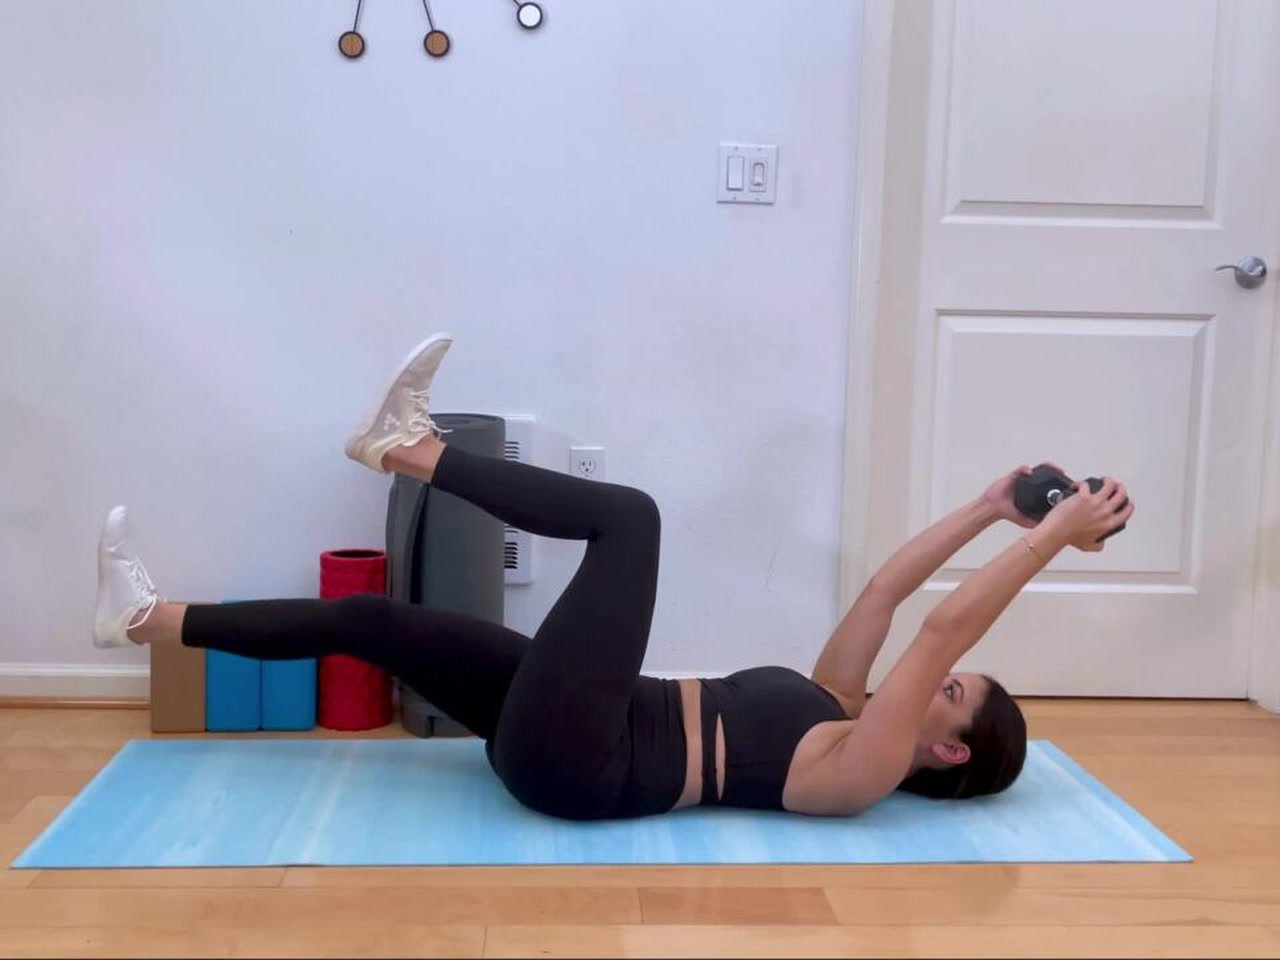
1. Chasing the floor with the weight. A deeper shoulder arc is not a better repetition when it depends on flared ribs or an exaggerated back arch. Stop short, reduce the load, or use the tabletop version with no moving leg.
2. Letting the lower back change shape on every rep. The purpose is to resist unwanted spinal movement. Watch whether your ribs and waistband separate as your arms lower. Reduce the reach until you can keep a steady torso throughout the arc.
3. Gripping the bell insecurely. A swinging or slipping kettlebell introduces a separate hazard above your head. Do a stationary grip check first. Choose a securely held dumbbell if the kettlebell handle does not suit your hands, and never take an implement to failure directly over your face.
4. Using the leg to generate momentum. The extending heel should move quietly. If the leg snaps down, the ribs rise or the return becomes a hip-flexor jerk, slow the rep and shorten the leg lever by keeping the knee slightly bent.
5. Treating abdominal discomfort as proof of effectiveness. Working abs and normal fatigue are expected; sharp shoulder, neck or back pain is not. Put the feet down, return the weight safely and modify the movement. People with persistent pain or relevant injury may need individualized guidance instead of forcing this exercise.
Filming one set from the side is useful: the camera will show whether the torso stays stable when both lever arms lengthen. Compare the first two repetitions with the final two, not only your perceived effort.
Equipment Worth Exploring
Explore equipment, accessories and gear from our carefully selected range.


Power Tower
Freestanding pull-up and dip station with adjustable handles for bodyweight training.

VForce Wall Trainer
Space-saving wall-mounted functional trainer with pivoting cable arms and variable resistance ratios.
VOLTRA
Compact digital cable trainer with smooth, adjustable resistance.

Go-Tone Pro
Portable digital cable trainer with up to 66 lb (30 kg) of adjustable resistance.


A four-week progression and where to put it in your training
Use this as a small core accessory rather than a main strength lift. Two sessions each week are enough to practice without letting soreness or fatigue interfere with heavy squats, hinges or upper-body sessions. Start with a very light weight or even empty hands. The progression below is a practical example, not a trial-tested prescription; move forward only when the earlier version remains smooth.
- Week 1: tabletop hold plus small arms-only pullover, two sets of six to eight slow reps. Focus on a steady rib cage and a secure grip.
- Week 2: tabletop pullover through a comfortable wider arc, two or three sets of six to eight reps. Do not add load just because the bell reaches farther.
- Week 3: alternate short leg reaches alongside the pullover, two sets of five or six reps per side. Stop if extending the leg changes the lumbar position.
- Week 4: keep the same load but add a brief controlled pause at the hardest point, or add one rep per side, for two or three sets. Change only one difficulty variable at a time.
Rest until you can begin the next set with the same breath control and shoulder range. If you are about to perform maximal barbell lifts, a single easy practice set may be preferable to a tiring core circuit. After a normal session, moderate controlled sets are reasonable. You can pair them with side planks or carries for different trunk challenges, but this drill does not replace progressively overloaded compound lifting or every other abdominal exercise.
To decide whether you improved, record the implement, range, leg reach and the first rep where form changes. Greater weight is not automatically the best result. A longer controlled arc with steady ribs, quiet hips and a confident grip is meaningful progress, even when the bell itself stays the same.
Calisthenics Shirts & Street Workout Gear
Calisthenics and bodyweight-training gear for pull-ups, dips, handstands and street-workout athletes.


Calisthenics Evolution Sticker
Stick a little “Calisthenics Evolution” humor on your favorite gear.

Calisthenics Workout Sweatshirt
Add a playful “Calisthenics” touch to your casual rotation.

Be Stronger Than Your Excuses Motivational Workout for Sticker
A fun “Be Stronger Than Your Excuses” touch for bottles, laptops, and lockers.


Handstand Walk Tee
Bring “: The Handstand Walk Beatles Graphic” humor to your next gym day.

Calisthenics Hanging Out Hoodie
Make your off-duty look more fun with “Calisthenics Hanging Out”.


Calisthenics Heartbeat – Pullups & Handstands & T-Shirt
Show some lifting attitude with a playful “Calisthenics Heartbeat” tee.